✔︎ Last updated on November 2nd, 2024
If you have ever wanted to keep your folders neatly organized on a Mac, this guide is for you. In this blog post, you will learn to how to automate file movements between various folders.
If your Downloads folder is anything like mine, it’s probably a bit chaotic. Throughout the day, I end up downloading all sorts of files—photos, images, PDFs—which quickly clutter things up. Now, while macOS offers plenty of ways to organize files, like grouping them by name, date, kind, or size, finding exactly what I need still becomes a hassle after a few days.
Keeping everything neatly organized can be a real challenge. Sure, I could manually sort each file into its own folder, but that would easily take up 3-5 minutes of my day. So, what’s my solution?
I set up an automation to handle it for me. It watches the Downloads folder for any new files and automatically moves them to their designated folders. For instance, all PDFs go straight into a folder called ‘PDF,’ and image files like JPGs and PNGs get sorted into an ‘Images’ folder without me lifting a finger.
Also read: Useful Browser Extensions for Excalidraw
Turns out, macOS has built-in support for creating these kinds of automations with a handy tool called Automator. It’s a native utility that makes setting up automations simple without the need for any coding skills.
So, let’s dive into what we’ll be doing and how you can set this up yourself.
Keep files and folders organized on Mac
1. Open Automator:
First, launch the Automator app on your Mac. You can find it through Spotlight or through the launchpad in your Applications folder.
2. Create a New Workflow:
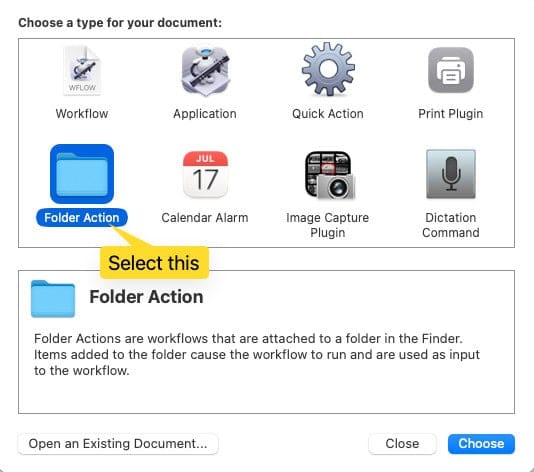
When you open Automator, it gives you some options for the type of workflow, select Folder Action.

This will let you create an automation that watches a folder for changes (such as addition of a new file).
Also read: Awesome Raycast Extensions for Supercharged Productivity
3. Choose the Folder to Monitor:
Select the Downloads folder as the folder to watch.

This tells Automator to track any new files added to this
4. Add the Action to Move Files:
- In the actions library to the left, search for the “Move Finder Items” action. Drag it into your workflow area.
- Choose the destination folder where you want the files to be automatically moved, like a folder for PDFs or Images. You can also create a new folder anywhere if it doesn’t exist and choose it as destination.
5. Add Filters for Specific File Types:
Before the Move Finder Items action, you’ll need to filter file types. For this, use the “Filter Finder Items” action.
In the actions library to the left, search for ‘Filter Finder Items’ and drag it and put it above the ‘Move Finder Items’ pane in the workspace.
Now, set up a condition to move files based on their type (e.g., PDFs, images). I have set the condition ‘If File extension ends with pdf’, move finder items to the pdfs folder.

You can also add another filter if you want to put multiple file types in the same folder.
6. Save and Test Your Workflow:
Save the workflow by pressing Cmd + S and giving it an identifiable name. Then, test it by downloading or putting a file into your Downloads folder to see if it automatically moves to the correct folder.
Usually, you won’t have to restart or log out of your user account for automations to start working, but occasionally, you might need to. So, if your automation isn’t working or giving you problems, try logging out and log back in.
(On my computer, it worked flawlessly without having to log out.)
7. Repeat for Other File Types:
If you want to organize different types of files (like PDFs, images, etc.) in their own separate folders, repeat the workflow mentioned above.
I hope you now have a good idea of how you can automate this basic stuff.
That’s that! From now on, whenever a new file is downloaded, it’ll automatically land in the right folder, saving you time and hassle.
Just keep in mind, the destination folder doesn’t have to be inside the ‘Downloads’ directory; it can actually be anywhere on your Mac.
If you liked this article, don’t forget to ping me on Twitter (X).
Thanks for reading.